개요.
세션 클러스터링을 하는 방법은 다양하다. 나는 레디스를 이용해보았다.
- how to install redis in window 10
- how to configure session clustering using redis in spring boot
- how does redis session in spring boot
- what does redis session expired key mean?
레디스
- in-memory data structure
(e.g. strings, hashes, lists, sets, sorted sets with range queries ETC) - used as db, cache, message brokers(pub/sub) ETC
- redis has built-in replication
- NHN 기술블로그에 레디스 관련 설명이 한글로 잘 나와있다.
세션 클러스터링
레디스를 이용한 세션 클러스터링의 구성도는 아래와 같다.
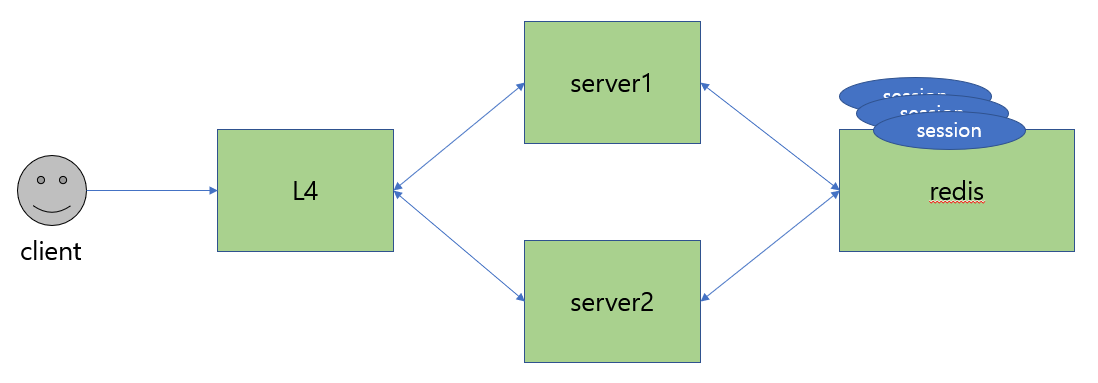
- 웹서버에 자주 이용되는 부하 분산 클러스터 구성이다. 흔히 웹서버에 접근할 때, 클라이언트는 직접적으로 웹서버에 접근하는 것이 아니라 로드밸런서 L4 장비를 통해서 VIP 로 접속해서 각 서버로 로드밸런싱된다.
- server1 에서 사용하는 session 이 있다면 server 2와 동기화가 이루어져야 한다. 이를 위해 세션클러스터링이 필요하고 그에 따라 필요한 저장소로 레디스를 이용하는 것이다.
- 세션 클러스터링이란 물리적으로 분리되어있지만 논리적으로 하나로 묶여있는 상태의 세션이고 동일 세션으로 서비스 내의 세션을 관리함을 말한다.
- +) 레디스 서버도 사실 replication 을 하여, master 노드와 slave 노드로 나누고, 클러스터링을 해야한다고 들었다. 나는 그에 대한 고려는 하지 않았다.
윈도우10, 레디스 설치.
레디스 클러스터링 실습을 위한 레디스를 설치한다. 해당 링크에서 .zip 파일 다운로드 이후 redis-server 및 redis-cli 를 차례대로 실행한다.

레디스 클러스터링 수행, 스프링부트 (2.2.5 version 기준)
1. 레디스 의존성 추가 (build.gradle)
- security 랑 controller 수행할 수 있도록 starter 도 있어야 한다.
implementation 'org.springframework.boot:spring-boot-starter-web'
implementation 'org.springframework.boot:spring-boot-starter-data-redis'
implementation 'org.springframework.session:spring-session-data-redis'
compile 'org.springframework.boot:spring-boot-starter-security'
2. @EnableRedisHttpSession 설정
- maxInactiveIntervalInSeconds 는 세션만료시간이고, 초단위이다. 레디스 내 저장될때는 밀리세컨드단위로 들어간다. (millisecond 는 1초의 10^(-3)) 아래의 코드는 60초이기 때문에 60000밀리세컨드이다.
@Configuration
@EnableRedisHttpSession(maxInactiveIntervalInSeconds = 60)
public class RedisHttpSessionConfiguration extends AbstractHttpSessionApplicationInitializer {

    public RedisHttpSessionConfiguration(){
        super(RedisHttpSessionConfiguration.class);
    }

    @Value("${spring.redis.host}")
    private String host;

    @Value("${spring.redis.port}")
    private Integer port;

    @Value("${spring.redis.password}")
    private String password;

    @Autowired
    private ObjectMapper mapper;

    @Bean
    public RedisConnectionFactory lettuceConnectionFactory() {
        RedisStandaloneConfiguration standaloneConfiguration = new RedisStandaloneConfiguration(host, port);
        standaloneConfiguration.setPassword(password.isEmpty() ? RedisPassword.none() : RedisPassword.of(password));
        return new LettuceConnectionFactory(standaloneConfiguration);
    }

    @Bean
    public RedisTemplate<String, Object> redisTemplate() {
        RedisTemplate<String, Object> redisTemplate = new RedisTemplate<>();
        redisTemplate.setConnectionFactory(lettuceConnectionFactory());
        redisTemplate.setEnableTransactionSupport(true);

        redisTemplate.setKeySerializer(new StringRedisSerializer());
        redisTemplate.setValueSerializer(new GenericJackson2JsonRedisSerializer(mapper));

        redisTemplate.afterPropertiesSet();

        return redisTemplate;
    }
}
3. 스프링 시큐리티 설정
@Configuration
@EnableWebSecurity
@RequiredArgsConstructor
public class SecurityConfiguration extends WebSecurityConfigurerAdapter {

    private final PasswordEncoder passwordEncoder;

    @Override
    protected void configure(AuthenticationManagerBuilder auth) throws Exception {
        auth.inMemoryAuthentication()
                .withUser("user").password(passwordEncoder.encode("1")).roles("USER")
                .and()
                .withUser("admin").password(passwordEncoder.encode("2")).roles("ADMIN");
    }

    @Override
    protected void configure(HttpSecurity http) throws Exception {

        http
                .csrf().disable()
                .authorizeRequests()
                .antMatchers("/admin/**").hasRole("ADMIN")
                .antMatchers("/anonymous*").anonymous()
                .anyRequest().authenticated();

        http
                .formLogin()
                .defaultSuccessUrl("/", true)
                    .and()
                .logout()
                .logoutUrl("/logout");
    }
}
4. 컨트롤러 설정
@RestController
public class DemoController {

    @GetMapping("/")
    public String root() {
        return "root";
    }

    @GetMapping("/admin")
    public String admin(){
        return "admin";
    }

    @GetMapping("/user")
    public String user() {
        return "user";
    }
}
5. yml 등록
spring:
  redis:
    host: localhost
    port: 6379
    password: ''
  session:
    store-type: redis
    redis:
      flush-mode: on_save
준비는 끝났다.
동일브라우저 기준.
- Test1
- localhost:8080 으로 앱서버를 띄운다.
- 로그인 수행이후 앱서버를 내리고 다시 띄운다.
- 로그인 상태 유무를 확인한다.
- Test2
- localhost:8080 과 localhost:8081 두 개의 앱서버를 띄운다.
- localhost:8080 으로 로그인접속 이후 localhost:8081 로 주소를 변환한다.
- 동일 계정으로 로그인 상태 유무를 확인한다.
이렇게 하는 이유는 하나의 서비스에 failover 이 일어난 경우에도 L4 에 의해 다른 서버로 액세스를 처리하였을때 동일 세션으로 처리되는지 확인하기 위함이었다. 정상적으로 동작하였다.
사실.
이때까지 한거는 구글링만 이것저것 하면 바로 할 수 있는 것들이었고, 레디스는 세션을 어떻게 보관하고 있는지가 해당 글을 쓰려고 했던 가장 큰 이유였다.
스프링 시큐리티로 접속하고 이후에 redis-cli 의 keys * 를 이용해 저장된 key 값을 살펴보았다.
127.0.0.1:6379> keys *
1) "spring:session:sessions:expires:e7f410fc-4de1-43a1-894d-abb1bc824fcc"
2) "spring:session:index:org.springframework.session.FindByIndexNameSessionRepository.PRINCIPAL_NAME_INDEX_NAME:user"
3) "spring:session:sessions:e7f410fc-4de1-43a1-894d-abb1bc824fcc"
4) "spring:session:expirations:1585330740000"
spring:session:sessions:e7f410fc-4de1-43a1-894d-abb1bc824fcc 는 hash 자료형이고, 필드는 총 5가지 저장하고 있음을 확인할 수 있다.
127.0.0.1:6379> type spring:session:sessions:e7f410fc-4de1-43a1-894d-abb1bc824fcc
hash
127.0.0.1:6379> hkeys spring:session:sessions:e7f410fc-4de1-43a1-894d-abb1bc824fcc
1) "lastAccessedTime"
2) "sessionAttr:SPRING_SECURITY_LAST_EXCEPTION"
3) "maxInactiveInterval"
4) "sessionAttr:SPRING_SECURITY_CONTEXT"
5) "creationTime"
spring:session:sessions:expires:e7f410fc-4de1-43a1-894d-abb1bc824fcc 은 string 자료형이고, 아무것도 저장되어있지 않다.
127.0.0.1:6379> type spring:session:sessions:expires:e7f410fc-4de1-43a1-894d-abb1bc824fcc string
127.0.0.1:6379> get spring:session:sessions:expires:e7f410fc-4de1-43a1-894d-abb1bc824fcc ""
redis-cli 의 기능 중 하나인 MONITOR 를 수행하면 spring:session:sessions:expires 세팅되는 과정을 볼 수 있다.
1585330636.991701 [0 127.0.0.1:2568] "APPEND" "spring:session:sessions:expires:e7f410fc-4de1-43a1-894d-abb1bc824fcc" ""
1585330636.992228 [0 127.0.0.1:2568] "PEXPIRE" "spring:session:sessions:expires:e7f410fc-4de1-43a1-894d-abb1bc824fcc" "60000"
여기서, 세션 만료 시간을 키 값으로 지정하는 이유는 spring session document 에 나와있다. (표현이 어렵다..)
Expiration is not tracked directly on the session key itself, since this would mean the session
data would no longer be available. Instead, a special session expires key is used.
In the preceding example, the expires key is as follows:

// 세션 키 값 자체에 만료시간을 추적하지 않는다. 왜냐하면 세션 키 값 자체는 세션 그 자체이기 때문이다.
// 삭제해버리면 해당 데이터를 사용하지 못한다.

// 따라서 특수하게 세션 만료에 대한 키 값을 따로 설정한다.
나는 레디스 모니터링을 수행하면서 한가지 특이점을 발견할 수 있었는데,
1585330637.065548 [0 127.0.0.1:2568] "PEXPIRE" "spring:session:sessions:e7f410fc-4de1-43a1-894d-abb1bc824fcc" "360000"앱단에서 @EnableRedisHttpSession(maxInactiveIntervalInSeconds = 60) 로 60000 밀리세컨드를 주었는데, spring:session:sessions 값은 5분(300000 밀리세컨드) 가 더해진 상태로 만료시간이 360000 밀리세컨드로 설정되는 부분이었다. 내가 설정한 만료시간은 세션만료키값(spring:session:sessions:expires:{session-id})에 설정되고, 해당 만료시간에 +5분의 값이 세션키값(spring:session:sessions:{session-id})에 설정된 것이다.
왜 이런것인지 검색하다가 스프링 세션 공식 도큐먼트에서 설명을 찾을 수 있었다.
Note that the expiration that is set to five minutes after the session actually expires.
This is necessary so that the value of the session can be accessed when the session expires.
An expiration is set on the session itself five minutes after
it actually expires to ensure that it is cleaned up,
but only after we perform any necessary processing.|
내용을 요약하면,
|
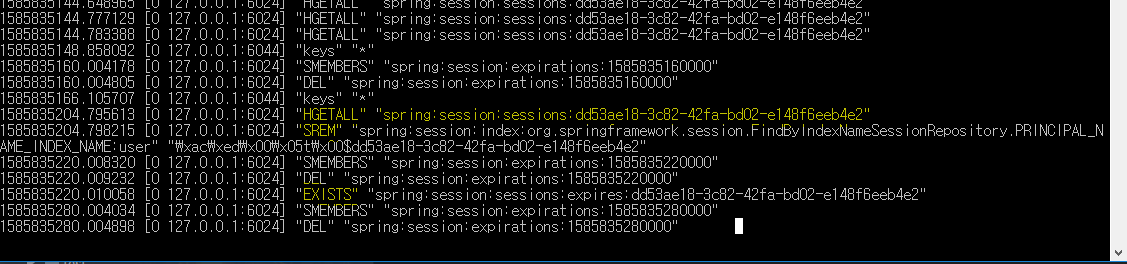
- HGETALL 을 통해 해시타입 내의 밸류 값 조회
- SREM 을 통해 spring:session:index 집합 내의 특정 user 의 session 제거. 애니메이션 링크
- EXISTS 를 통해 spring:session:sessions:expires:{session-id} 값 존재 여부 확인. 존재 1 리턴, 미존재 0 리턴
레디스를 이용해 세션클러스터링을 한건 좋았는데, redis-cli 를 통해 모니터링을 하면서 값의 변화를 살펴보니 이해가 안되는 부분이 있어서 찾다가 왜 값이 그렇게 세팅되는지에 대한 이유를 알 수 있어 좋았다.
추가적으로 로컬에서 작업할 시에는 레디스가 없는 경우도 있기 때문에 environment 별로 레디스 세션 레파지토리를 활성/비활성 할 수 있는 내용도 있었다. 해당 내용까지 쓰면 길어질 것 같아서 참고링크로 대체하려고 한다. (@Profile 애노테이션이 작동하지 않고 @AutoConfiguration 관련 내용이었다.)
+) 왜 세션 저장소로 레디스를 선택했는가?
mysql 로도 충분하게 세션 스토리지를 쓸 수 있고 redis 아니더라도 충분하게 다른 nosql 에서의 사용도 가능하기 때문이다.
나의 생각은 아래와 같다.
- spring framework 에서 고도하게 추상화된 api 를 제공해주고 있는 상태이고, 간단하게 의존성만 추가하면 손쉽게 도큐먼트를 보고 적용시킬 수 있기 때문이다. (물론 스프링 도큐먼트 단에서 다른 저장소에 대한 자료도 같이 존재한다.)
- 디스크에 읽어들이는 mysql 에 비해서 빠르다. 그리고 비정형화된 상태의 데이터를 손쉽게 저장 및 조회할 수 있다.
- 이후에 사용자의 수가 급속도로 많아지게 되면서 세션을 관리하고 할 때 손쉽게 스케일 아웃이 가능하다. mysql 의 경우에는 스케일 업을 수행해야 한다. (서버 물리 장비의 스펙을 높이는 작업이 필요하다. 반면에 스케일 아웃은 서버의 대수를 늘리는 작업으로 노드만 추가해주면 된다. 상대적으로 쉽다.)
참고링크
- https://docs.spring.io/spring-session/docs/1.3.4.RELEASE/api/org/springframework/session/data/redis/RedisOperationsSessionRepository.html
- https://docs.spring.io/spring-session/docs/current/reference/html5/
- https://deveric.tistory.com/76
- https://sadique.io/blog/2016/07/16/controlling-redis-auto-configuration-for-spring-boot-session/
- https://redislabs.com/wp-content/uploads/2018/04/Spring-Session-Redis-Why-How-and-Production-Pitfalls.pdf
'Spring' 카테고리의 다른 글
| 20200523 [jpa] 스프링부트 실행 시, 디비 데이터 삽입 및 테스트 코드 상에서 데이터 삽입. (수정 : 2021-08-22) (0) | 2020.07.01 |
|---|---|
| 20200502 [kafka] springboot-kafka 작성해보기. (0) | 2020.05.05 |
| 20180304 @RequestMapping 에 대한 이해. (수정 2020-08-17) (2) | 2020.03.25 |
| 20191006 Request Payload & Form Data (SpringBoot & Vue) (0) | 2019.10.06 |
| 20190925 ObjectMapper 싱글톤 설정 및 LocalDateTime 과의 관계. (0) | 2019.09.25 |